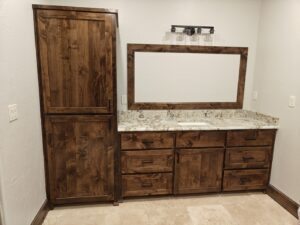
Kitchen cabinets endure more stress than almost any other furniture in your home. From daily door slams and drawer pulls to steam from cooking and temperature fluctuations, cabinet joints face constant challenges. After four decades in the cabinet making business, I’ve learned that using the best glue for kitchen cabinets can mean the difference between repairs lasting decades or failing within months.
Most homeowners grab whatever wood glue they find at the hardware store, not realizing that kitchen environments demand specific adhesive properties. The wrong choice leads to joint failures, loose doors, and expensive repairs that could have been avoided. Today, I’m sharing the professional-grade adhesive that has never failed us in thousands of cabinet projects.
Why Kitchen Cabinets Need Special Adhesive Considerations
Kitchen environments create unique challenges that separate amateur repairs from professional results. Understanding these factors is crucial for selecting the best glue for kitchen cabinets.
Moisture and Humidity Challenges
Kitchens experience dramatic humidity swings that would destroy furniture in other rooms. Steam from cooking, dishwasher cycles, and frequent cleaning create an environment where standard adhesives fail.
Moisture Sources in Kitchens:
- Cooking steam and vapor
- Dishwasher heat cycles
- Sink splash and spray
- Frequent cabinet cleaning
- Seasonal humidity changes
How Moisture Affects Cabinet Glue:
- Causes wood expansion and contraction
- Weakens adhesive bonds over time
- Creates joint stress and separation
- Promotes mold and mildew growth in failed joints
Temperature Fluctuations
Kitchen temperatures vary more than any other room, creating expansion and contraction cycles that stress cabinet joints continuously.
Temperature Stress Factors:
- Oven heat radiating to nearby cabinets
- Refrigerator cooling cycles
- Seasonal HVAC variations
- Hot water pipes behind cabinet walls
- Direct sunlight through windows
Daily Use and Abuse
Kitchen cabinets work harder than bedroom or living room furniture, requiring adhesives that can handle constant stress.
High-Stress Applications:
- Repeated door opening and closing
- Heavy dishware loading and unloading
- Children hanging on cabinet doors
- Impact from pots, pans, and appliances
- Frequent cleaning and maintenance
Our Top Recommendation: Titebond II Premium Wood Glue
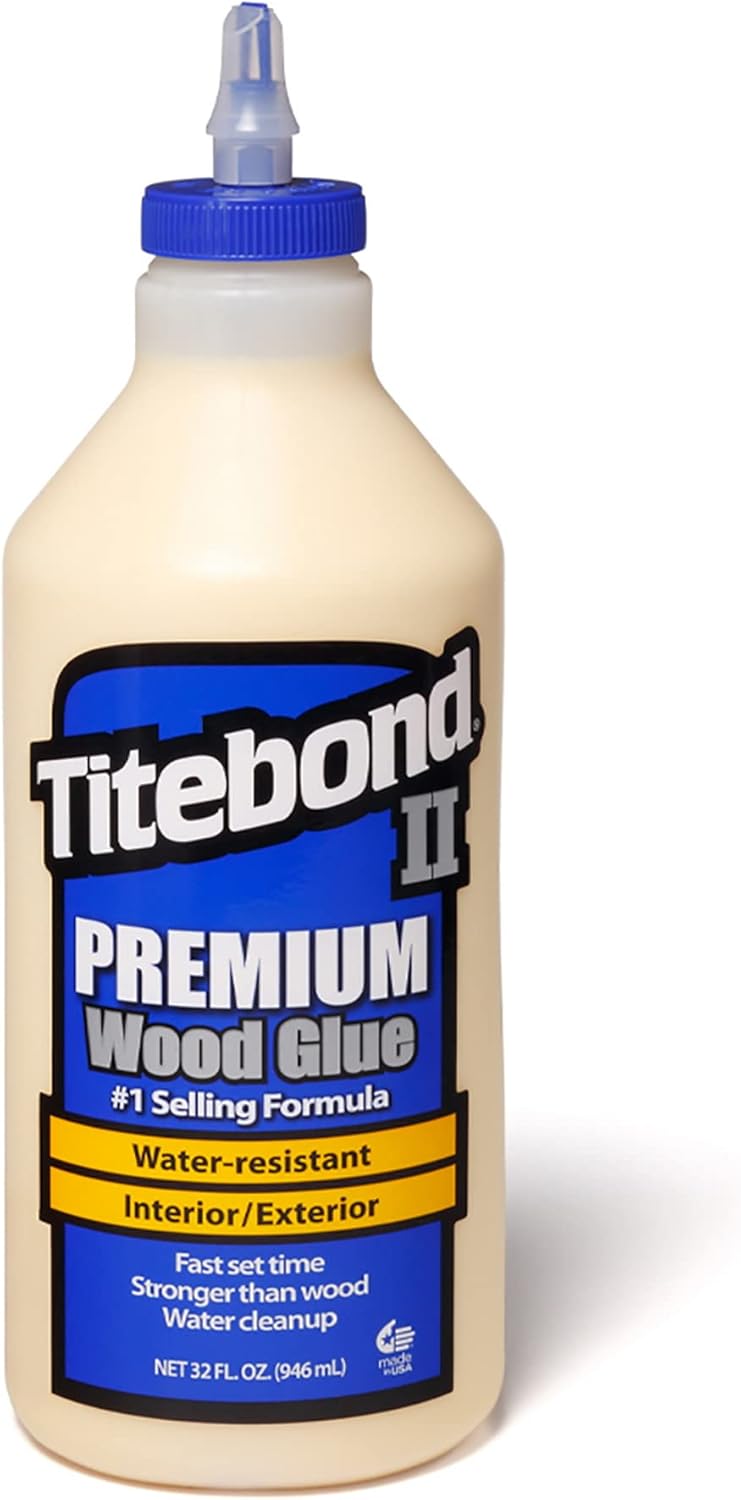
Franklin International 5005 Titebond II Premium Wood Glue, 32-Ounce Bottle
After testing dozens of adhesives over four decades of professional cabinet work, we consistently recommend Titebond II Premium Wood Glue as the best glue for kitchen cabinets. This isn’t just another wood glue – it’s specifically engineered for moisture-resistant applications that kitchen environments demand.
Why Titebond II Stands Out as the Best Glue for Kitchen Cabinets
Superior Moisture Resistance: Unlike standard wood glues that fail when exposed to humidity, Titebond II maintains bond strength even in high-moisture kitchen environments. This Type II water resistance rating means joints stay strong through years of cooking steam and cleaning.
Temperature Stability: Kitchen heat sources don’t phase Titebond II. The adhesive maintains integrity from freezing temperatures to 150°F, covering the full range of kitchen temperature variations.
Professional Strength: With 3,750 PSI bond strength, Titebond II exceeds the strength of most cabinet woods themselves. Failed joints occur in the wood, not the glue line – exactly what you want in professional cabinet work.
Extended Working Time: Kitchen cabinet repairs often involve multiple joints and complex assemblies. Titebond II’s 10-15 minute open time allows proper positioning and adjustment without rushing.
Food-Safe When Cured: Once fully cured, Titebond II is completely food-safe, making it perfect for cabinet interiors where dishes and food storage occur.
Professional Application Techniques
Proper application technique determines whether even the best glue for kitchen cabinets delivers professional results.
Surface Preparation:
- Clean all surfaces of dust, grease, and old finish
- Sand lightly with 120-grit paper for optimal adhesion
- Ensure wood moisture content is between 6-12%
- Test fit all joints before applying adhesive
Application Process:
- Apply thin, even coat to both surfaces
- Spread with brush or roller for complete coverage
- Assemble within working time (10-15 minutes)
- Apply adequate clamping pressure (150-300 PSI)
- Maintain pressure for minimum 30 minutes
- Allow 24 hours before stress loading
Professional Tips:
- Slightly warm glue flows easier in cold conditions
- Remove excess glue immediately with damp cloth
- Don’t over-clamp – excessive pressure squeezes out adhesive
- Plan assembly sequence to avoid time pressure
Common Kitchen Cabinet Glue Applications
Understanding specific applications helps you apply the best glue for kitchen cabinets effectively in various repair scenarios.
Door and Drawer Joint Repairs
Mortise and Tenon Joints: Kitchen cabinet doors with traditional joinery benefit from Titebond II’s gap-filling properties and long open time.
- Clean out old adhesive completely
- Apply glue to both mortise and tenon surfaces
- Use proper clamping techniques for square assembly
- Allow full cure time before hardware installation
Dowel Joint Repairs: Modern cabinet doors often use dowel construction that can fail under kitchen stress.
- Drill out loose dowels carefully
- Clean dowel holes thoroughly
- Apply Titebond II to dowel and hole surfaces
- Insert dowels and clamp until cured
Face Frame Attachments
Face frames receive constant stress from door and drawer operation, making proper adhesive selection critical.
Pocket Screw Reinforcement: Even mechanical fasteners benefit from adhesive reinforcement.
- Apply glue to face frame contact surfaces
- Install pocket screws through wet glue
- Wipe excess immediately for clean appearance
- Combined mechanical and adhesive bond provides maximum strength
Cabinet Box Repairs
Corner Joint Failures: Cabinet boxes can develop corner separations from temperature cycling and settling.
- Disassemble failed joint if possible
- Clean old adhesive residue completely
- Apply fresh Titebond II to both surfaces
- Reassemble with proper clamping pressure
- Check for square during cure process
Back Panel Attachments: Loose cabinet backs allow racking and door misalignment.
- Remove loose back panel
- Clean contact surfaces on cabinet box
- Apply adhesive to panel edges and cabinet rabbets
- Reinstall with temporary fasteners for positioning
- Allow cure before removing temporary supports
Comparing Adhesive Options for Kitchen Cabinets
While Titebond II ranks as our choice for the best glue for kitchen cabinets, understanding alternatives helps make informed decisions.
Standard Wood Glues (Type I)
Advantages:
- Lower cost than specialty adhesives
- Widely available at hardware stores
- Familiar to most DIY enthusiasts
- Good strength for interior applications
Limitations:
- Poor moisture resistance for kitchen use
- Temperature sensitivity affects bond strength
- Shorter open time creates application pressure
- Not suitable for high-humidity environments
Polyurethane Adhesives
Advantages:
- Excellent moisture resistance
- Gap-filling properties
- Strong initial grab
- Works on various materials
Limitations:
- Difficult cleanup requires solvents
- Foam expansion can create messy joints
- Higher cost than traditional wood glues
- Requires moisture to cure properly
Epoxy Adhesives
Advantages:
- Superior strength and durability
- Excellent gap-filling capability
- Chemical and moisture resistance
- Can be machined when cured
Limitations:
- Complex mixing requirements
- Short working time creates pressure
- Difficult to sand and finish
- Much higher cost than wood glues
Construction Adhesives
Advantages:
- Fast initial grab for positioning
- Gap-filling properties
- Works on multiple materials
- No clamping required for some applications
Limitations:
- Not designed for fine woodworking
- Poor sandability for smooth finishes
- Limited strength compared to wood glues
- Thick consistency makes precise application difficult
Professional Installation and Repair Techniques
Achieving professional results with the best glue for kitchen cabinets requires proper technique and patience.
Clamping Strategies for Cabinet Work
Face Frame Clamping:
- Use parallel jaw clamps for even pressure distribution
- Protect surfaces with clamping blocks
- Check for square throughout glue-up process
- Apply enough pressure to close joints without starving
Door and Drawer Clamping:
- Band clamps work well for frame assemblies
- Check diagonal measurements for square
- Alternate clamp positions to prevent bowing
- Remove excess glue immediately for clean joints
Working in Kitchen Environments
Temperature Considerations:
- Warm adhesive flows better in cold kitchens
- Avoid gluing during extreme temperature swings
- Allow longer cure times in cool conditions
- Consider heating work area for winter repairs
Humidity Management:
- Use fans to circulate air during cure
- Avoid gluing during high humidity days
- Monitor cure progress in humid conditions
- Allow extra time for full strength development
Quality Control and Testing
Joint Inspection:
- Look for complete glue coverage on both surfaces
- Check for gaps or voids in glue lines
- Ensure proper clamp pressure without over-tightening
- Verify square assembly before adhesive sets
Strength Testing:
- Test joints after full cure period
- Apply moderate stress to verify bond strength
- Look for wood failure rather than adhesive failure
- Document successful techniques for future use
Long-Term Performance and Maintenance
The best glue for kitchen cabinets should provide decades of reliable service with minimal maintenance.
Monitoring Joint Performance
Regular Inspection Schedule:
- Check cabinet joints quarterly for signs of movement
- Look for gaps or separations around stress points
- Monitor for moisture damage or discoloration
- Address small issues before they become major problems
Warning Signs:
- Visible gaps in previously tight joints
- Doors or drawers becoming misaligned
- Squeaking or creaking during operation
- Loose or wobbly cabinet components
Preventive Maintenance
Environmental Controls:
- Maintain consistent kitchen humidity levels
- Use exhaust fans during cooking to remove steam
- Address plumbing leaks promptly
- Ensure adequate ventilation around cabinets
Usage Considerations:
- Avoid slamming cabinet doors and drawers
- Don’t overload shelves beyond design capacity
- Clean up spills immediately to prevent moisture damage
- Use soft-close hardware to reduce impact stress
Cost Analysis and Value Considerations
Investing in the best glue for kitchen cabinets pays dividends in long-term performance and reduced maintenance costs.
Initial Cost Comparison
Budget Adhesives: $3-6 per bottle
- Higher failure rate requiring repairs
- Limited working time creates application pressure
- Poor moisture resistance for kitchen environments
- False economy when repairs fail prematurely
Professional-Grade Adhesives: $8-15 per bottle (Titebond II)
- Superior performance in kitchen conditions
- Extended working time for proper application
- Moisture resistance prevents joint failure
- Lower total cost when considering longevity
Long-Term Value Analysis
Quality Investment Benefits:
- Reduced need for repeat repairs
- Better performance in challenging kitchen conditions
- Professional results that increase cabinet value
- Peace of mind from proven reliability
Total Cost Considerations:
- Initial adhesive cost vs. repair frequency
- Labor time for application and cleanup
- Material waste from failed applications
- Professional repair costs for major failures
Professional Services and Expert Support
While many cabinet repairs using the best glue for kitchen cabinets are within DIY capabilities, complex projects benefit from professional expertise. At The Cabinet Craftsmen, our four decades of experience includes thousands of cabinet repairs using proven adhesives and techniques.
When to Seek Professional Help
Complex Structural Repairs:
- Multiple joint failures requiring sequential repair
- Cabinet box damage affecting structural integrity
- Face frame repairs requiring precise alignment
- Custom matching of existing joinery techniques
High-Visibility Applications:
- Kitchen islands and prominent cabinet features
- Antique or heirloom cabinet restoration
- Repairs requiring perfect color and grain matching
- Projects where mistakes would be costly to correct
Professional Advantages
Expert Assessment:
- Accurate diagnosis of failure causes
- Appropriate adhesive selection for specific conditions
- Proper repair sequencing for complex projects
- Quality assurance throughout the process
Specialized Tools and Techniques:
- Professional clamping systems for large assemblies
- Environmental controls for optimal cure conditions
- Color matching expertise for invisible repairs
- Warranty coverage on workmanship and materials
Regional Considerations for Oklahoma Kitchens
Oklahoma’s climate presents specific challenges that affect adhesive performance in kitchen cabinet applications.
Climate-Specific Factors
Seasonal Humidity Variations: Oklahoma experiences significant seasonal humidity swings that stress cabinet joints continuously.
Summer Challenges:
- High humidity can extend cure times
- Increased wood movement stresses joints
- Air conditioning cycling creates temperature swings
- Storm systems bring rapid humidity changes
Winter Considerations:
- Low humidity can accelerate cure times
- Heating system operation affects kitchen conditions
- Wood contraction can open existing joints
- Plan major repairs during stable weather periods
Local Material Considerations
Regional Wood Species: Oklahoma cabinets often feature local hardwoods with specific characteristics.
- Red Oak: Requires adhesives with good gap-filling properties
- Pecan: Dense wood needs longer cure times for full strength
- Eastern Red Cedar: Natural oils may affect adhesive bonding
Conclusion
Selecting the best glue for kitchen cabinets dramatically impacts repair longevity and performance. Through four decades of professional cabinet work, Titebond II Premium Wood Glue has consistently delivered superior results in challenging kitchen environments.
The combination of moisture resistance, temperature stability, and professional-grade strength makes Titebond II the clear choice for serious cabinet work. Whether you’re repairing loose joints, reinforcing cabinet boxes, or building new cabinets, this proven adhesive provides the reliability that kitchen applications demand.
Remember that even the best glue for kitchen cabinets requires proper application technique and adequate cure time. Don’t rush the process – take time for thorough surface preparation, proper clamping, and full cure time. These extra steps separate amateur repairs from professional results that last decades.
For homeowners comfortable with woodworking projects, Titebond II provides the performance needed for successful cabinet repairs. Combined with the techniques outlined in this guide, you can achieve results that rival professional cabinet work.
Planning major cabinet repairs or facing complex joint failures? Contact The Cabinet Craftsmen for expert assessment and professional repair services. Our four decades of experience ensure your kitchen cabinets receive the quality workmanship they deserve.
This article contains affiliate links, which means we may earn a small commission at no extra cost to you if you click through and make a purchase.